Edge Trimming
Cover to Cover: Exposing the Bookbinder's Ancient Craft
Since the sewn text-block was composed of folded sheets, the edges needed to be cut so that every page could be turned. The time-honoured method for binding books is ‘in-boards’. When it came to trimming a book’s page edges, it was important to understand the distinction between this and the method for cutting ‘out-of-boards’ work. In-board volumes were cut in their boards, that is, the boards were laced on before any cutting to the page edges was performed. Out-board volumes were cut before the boards were attached.
Edge Cutting (In-boards)
The traditional approach to cutting in-boards required a press and plough, a pair of cutting boards and two flat pieces of steel, known as trindles. The boards, having already been cut during the attachment stage, were next marked with a pencil line to which the page edges needed to be cut. A strip of paper was used to measure the distance from the spine to the edge of the smallest page in width. The binder passed this strip around the profile of the book, carefully marking out in pencil the cutting distance.
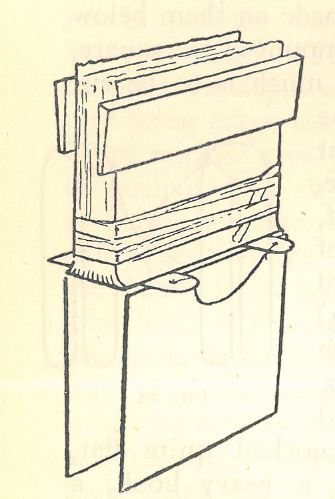
The book’s recently rounded back was then flattened out so that the fore-edge also became straight, in preparation for cutting. By holding the book firmly, the binder allowed the boards on either side to drop flat upon the bench. The trindles were then inserted around the cords nearest the head and tail and between the book and the boards, thus flattening out its back. The book was then placed between a pair of cutting boards, similar in appearance to backing boards, only without the angled top edge. The trindles were removed and the whole gently lowered into the lying press. The right-hand cutting board was placed flush with the cheek of the press and the pencil guide-line which had been marked up on the book. The left-hand cutting board was placed slightly higher so that it sat above the press. A thin piece of millboard could be placed between the cutting boards and the book on both sides to minimise the risk of damage from the plough knife. When satisfied with the accuracy of the placement, the binder placed the plough on the rods and slowly worked it to and fro, trimming the edges, carefully turning the screw as the plough receded away.
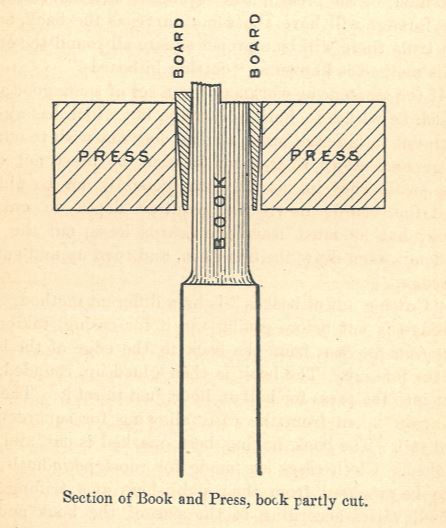
The head of the book was then cut. The two boards of the book were set in their correct position and the front board eased down to the pencilled guide-marks on the endpaper indicating the place to be cut. The boards were pushed up tightly into the joints and a thin piece of millboard was placed between the endpaper and the book board, so that the book would not be damaged with the knife. A cutting board was then placed on the front and back of the book even with the book boards. The whole was lowered into the press and adjusted so that the front board, which was on the pencilled guide-line, was flush with the right cheek of the press. The press was then tightened and the edges cut as per the fore-edge. The process was repeated for the tail of the book. When removed from the press, the book would automatically fall back into its round, the straight cut made on its fore-edge taking on a smooth concave shape.
return to topEdge cutting (Out-of-boards)
The method for cutting books out-of-boards was much simpler than that used for in-board work as the binder did not have to contend with the boards. As per in-board trimming, the cutting points were measured and pencilled around the profile of the book. On one cutting board a piece of binder’s board was laid level with its top edge (for protection from the plough knife). On this, the book was laid so that its fore-edge was level with the board. The second board was placed on top of the book with its top edge in line with pencilled cutting marks. The second cutting board was placed flush with this and the whole carefully lowered into the press. When the book was accurately positioned, the press was tightened and the edges trimmed using the press and plough as in in-board cutting. The binder then proceeded to cut the head and tail in the same manner.
Using the plough took a great deal of skill and, and regular maintenance was required to keep it in good working order. The plough knife needed to be sharpened to a fine point but only on its upper side; the under-side was to be kept absolutely flat. The knife edge needed to be checked regularly to ensure it was running horizontally and perfectly level with the base of the plough, otherwise the book edge would be cut at an angle. When used for cutting boards, however, the plough knife was not to have too fine a point, for it was at risk of being broken off on the tough boards.
Nowadays, cutting with the plough is rarely practiced, especially when it comes to in-board work. Most modern binderies have cutting machines or guillotines which can be used to quickly slice the edges of a book before it’s rounded and backed and the boards are attached. With the press of a button, all three edges can be cut in a matter of seconds, hence the growing preference for binding out-of-boards. Why then, given this faster, simpler alternative for edge-cutting, would some binders continue to persist with the plough and the centuries-old method of binding in-boards? The answer to that lies in the end results. If a book is rounded, backed and set before its edges are cut with a plough, they will have a smoothness that can be obtained in no other way. A comparison of its fore-edge with that of a book cut before rounding will show the former as perfectly smooth, whilst the latter exhibits an obvious ‘stepped’ effect.
The Plough
Until the 1840s, when the guillotine was introduced, the plough was the only means of cutting available to the binder. In The Art of Bookbinding (1890) Joseph Zaehnsdorf describes its operation: "All cutting presses [and ploughs] are used in the same way. The plough running over the press, its left cheek running between two guides fastened on the left cheek of the press. By turning the screw of the plough the right cheek is advanced towards the left: the knife fixed on the right of the plough is advanced, and with the point cuts gradually through the boards or the paper secured in the press...".
The book is cut by drawing the plough to and fro, each time it is brought towards the binder a slight turn is given to the screw of the plough. If too much screw is given the knife will bite too deeply, tearing the paper instead of cutting it. If the knife is not sufficiently sharp it will create ridges on the paper edges.
Lee Hayes
May 2018